A watermark is a pattern or word that appears in a document for the purpose of classification or identification. You may have seen Word documents with the fainted mark of “confidential” or “property of..” which are basically watermarks. In this article, I would describe how you can add or remove watermarks in Word files
[toc]
How to add watermark in Word?
The process of adding watermarks to a document in Word is quite easy. Follow these steps:

- Go to the Design tab in the ribbon
- On the top right of the screen, you will find the option of Watermark, click on the drop-down arrow.
- This will show you a few existing watermarks that are usually used. You can select the one you want and it’ll be automatically adjusted in your document
- If you can’t find what you are looking for, click on More Watermarks from Office.com. You must have an internet connection for this
- If you still can’t find your required Watermark, you can create it. Follow the below section of How to create watermark in Word
How to create watermarks in Word?
You can simply create your own watermark using Word tools as well. Follow these steps:
1. Create watermark using picture:
You can use a picture as watermark, here’s how:
- Open the Design tab from the ribbon
- Go to the watermark option and open the drop-down menu
- Then select Custom watermark. This will open the watermark dialog box
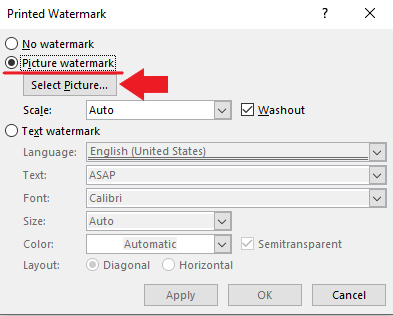
- Select Picture watermark option, then click on Select Picture
- This will open a new window to browse pictures from. You should have an internet connection to see all the available picture browsing options. However, if you don’t have internet, in the pop-up window, select “work offline”. This will allow you to browse a picture from your computer
- Once you have selected it, adjust its scale. By default, it is set to an auto which will automatically adjust the watermark according to the size of your page. You can change the scaling if you wish, Word will show you different percentage levels of scaling to select from.
- Washout option is to make your watermark fade. so it doesn’t steal the focus from your document and cause unclarity in the document. You can check the box next to it if you want it faded
- Once you are done adjusting the picture, click Apply and then OK
2. Create watermarks using Text
You can also create a watermark by writing it in the text field in the watermark section. Here’s how you can create a text watermark:
- Open the Design tab from the ribbon
- Go to the watermark option and open the drop-down menu
- Then select Custom watermark. This will open the watermark dialog box
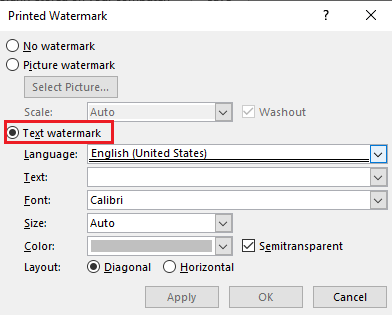
- Select the Text watermark option. Once you select this option, you will see further options
- Language: Select the language from the drop-down menu in which you want to create the watermark
- Text: Select which text you wish to be used as the watermark from the drop-down menu. You can also type text by yourself
- Font: Select the font in which you want the watermark to be
- Size: Select what size you want for the watermark text. By default, it’ll be auto to automatically adjust the size of the watermark on the page
- Color: The usual color for watermark is gray. You can select any other color if you want using this option
- Layout: Select how you want your watermark to appear in the document, horizontal or diagonal
- Checking the box of Semitransparent will fade the watermark. Choose this option based on your preference
How to remove watermarks in Word?
You can also remove watermark in Word. Here are two ways to do so:
1. Using watermark options
You can use the built in remove watermark option in Word to remove it. Here’s how:
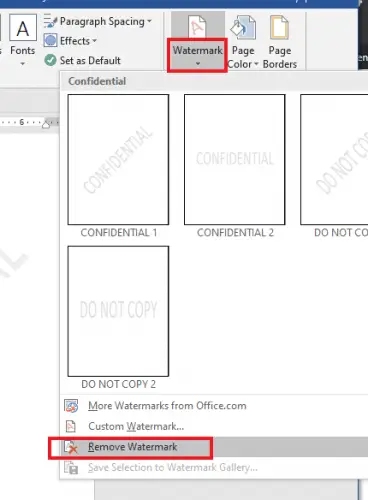
- Open the Design tab from the ribbon
- Go to the watermark option and open the drop-down menu
- Then select Remove watermark.This will remove the watermark present in the document
2. Using Header
This is another way you can remove watermark if the above option doesn’t work.Here’s how:

- Tap on the top of the page in the header area to activate it
- This will also highlight the watermark, there will be arrows around the boundary of it
- Once it is selected, click delete from your keyboard
- Deleting it from one page will delete it from a complete document. You will not have to individually delete it from each page
Conclusion
You can consult Microsoft Office support to further learn about Watermarks option in Word.