Windows Remote Desktop enables us to connect to our systems remotely through the network or internet. It’s very useful if we are connected to a network and we want to use several computers. We can open the desktops or screens of all the computers and do whatever we want to do.
In Windows XP, enabling Windows Remote Desktop was simple. But it’s a little different in Windows Vista and Windows 7. Here I list down three methods that can be used to enable Remote Desktop in Windows Vista and Windows 7.
1- Using Graphical User Interface
This is the simplest of methods. To enable Windows Remote Desktop graphically, do the following:
Start Run by pressing Windows Key + R
Write the following command in the Run dialog box: systempropertiesremote
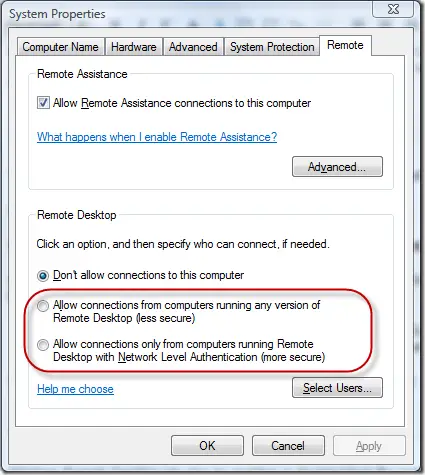
Windows Remote Desktop Connection Properties will come up. Under Desktop box, Select one of the following:
- Allow connections from computers running any version of Remote Desktop.
- Allow connections from computers running Remote Desktop with network level authentication.
This will enable Remote Desktop in Windows Vista and also in Windows 7.
2- Using Windows Registry
Windows Remote Desktop can also be enabled or disabled from the registry. This method is specially useful when you want to enable Remote Desktop remotely. You can connect to the registry of the remote computer through remote registry and make changes accordingly.
To enable Remote Desktop through registry, do the following:
Go to the following registry key:
HKEY_LOCAL_MACHINE\SYSTEM\CurrentControlSet\Control\Terminal Server
In the right hand pane, find the key fDenyTSConnections and make the value to 0 to enable Remote Desktop
If you want to enable Network Level Authentication, then do the following:
Go to the following registry key:
HKEY_LOCAL_MACHINE\SYSTEM\CurrentControlSet\Control\Terminal Server\WinStations\RDP-Tcp
In the right hand pane, find the key UserAuthentication and change the value to 1.
3- Using Group Policy
To enable Remote Desktop from the group policy, do the following:
Open Group Policy editor by going to Run and typing gpedit.msc
In the group policy editor, go to the following thread:
Computer Configuration \ Administrative Templates \ Windows Components \ Terminal Services \ Terminal Server \ Connections
In the right hand pane enable to following:
Allow users to connect remotely using Terminal Services
The original article was for enabling remote desktop connection in Windows Vista and Windows 7. But now I have verified that these methods work in Windows 8 too. So if you are using Windows 8, you can easily use these methods to enable or disable RDC. But if you are unsure, just follow our guide of 3 ways to enable Remote Desktop Connection in Windows 8. If there is any other method by which RDC can be enabled, please share in the comments.