Computer network communication works using software ports. Ports are application specific end points 65,535 ports of which 1024 are pre-defined also known as well-known ports. You can learn more about computer ports through this Wiki article. Viruses and hackers use open ports in the Operating System to have illegal access to the system. The simplest way to stop hackers from connecting to your computer is to close all the opened ports. But this means that all your network communication will come to a halt.
The solution to this problems is that you should only open those ports which are needed by the running applications in your computer. For example, if you are using FTP services, you should open port 21 which is the default port for FTP services. Similarly, if you are using an SSH client, you should open port 22 for the application to communicate.
A firewall is used for this very purpose, to close and open computer ports at will. A good firewall can detect inbound and outbound connections to the computer. Windows also comes with a basic firewall which is capable of controlling only inbound connections. This means that if there is a virus in the computer, it will be able to communicate with a remote server without any problems if you are using only Windows Firewall. But if you are using an antivirus like Windows Defender, you are most likely safer from outbound connection attacks.
In this article, we will discuss how to open or close the TCP/UDP ports in Windows for better security and control over your computer. This article applies to all Windows which have Windows Firewall enabled. This includes Windows XP SP2+, Windows Vista, Windows 7 and Windows 8. We will be using Windows 8 for this tutorial. So all the screenshots will be taken from Windows 8. The same steps with some visual changes can be applied to Windows 7 and earlier Operating Systems.
To open or close a port in Windows 8, follow the steps below:
- Go to Control Panel (Windows Key + X + P) –> System and Security –> Windows Firewall
- In the left hand pane, click on the “Advanced Settings” link.
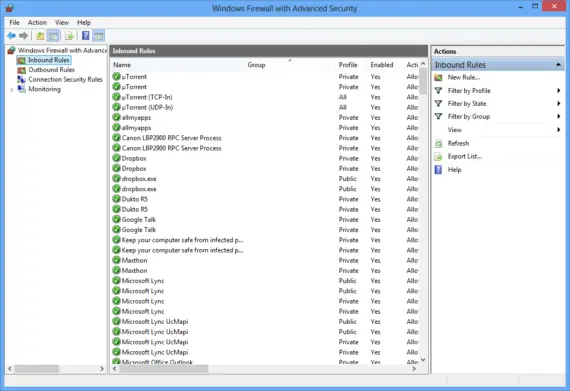
- On the left hand pane, click on Inbound Rules. You will see a list of rules that have already been made by Windows Firewall.
- To create a new rule, click on “New Rule” in the right hand pane.
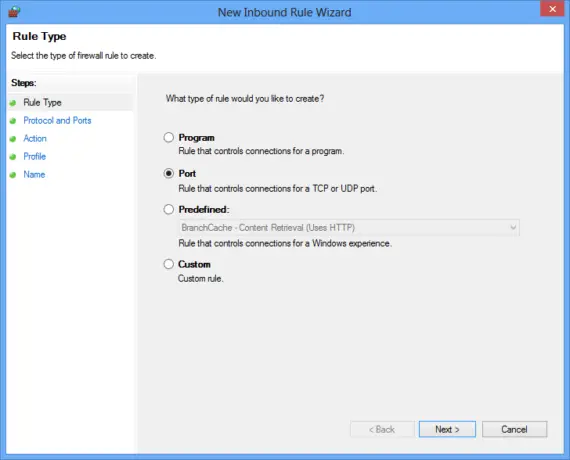
- You will need to select the type of rule that needs to be created. The options include Program, Port, Predefined and Custom. Since we are opening or closing a port, we will select the type as Port.
- On the next screen, you will get an option to select the port type as TCP or UDP. Most of the times, TCP is the port type that we will need to select.
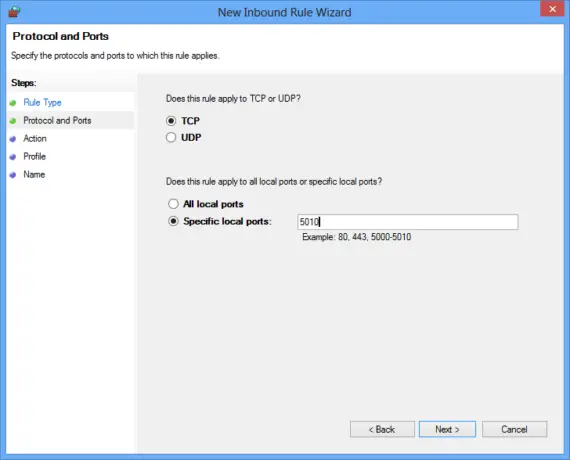
- In the next step, you will need to select whether this rule should apply to all local ports or specific ports. You can specify a port number if you want the rule to be applied on a specific port.
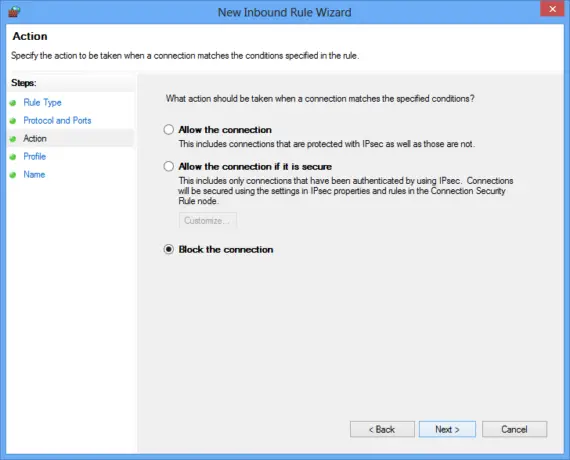
- On the next screen, you will actually make the rules. The rules include “Allow the connection”, “Allow the connection if it is secure” and “Block the connection. If you want to open the port, you will need to select the first option and if you want to close a port, you will need to select the last option.
- On the next screen, you will get an option to apply the rule on specific network types like Domain, Private or Public.
- In the last step, just give a name to your rule and press the Finish button.
If you want to see which ports are currently open in your computer, you can use the command “netstat” from Command Prompt. This command will display all the open ports in Windows. CurrPorts is a utility which can display open ports in graphical user interface which can be better understood by the user.
I hope this tutorial will help you in configuring your Windows 7 or Windows 8 Firewall better and I’d like to thank you for reading. Any comments and suggestions are always welcome.